Tag: Star Trek

A Tribute to Leonard Nimoy

This week’s post is a tribute to the late Leonard Nimoy.

Death is one of those things I’ve never been good at talking about. Leonard Nimoy was one of Star Trek’s most beloved actors and a world-wide icon. Millions have been deeply affected by his passing, and I am one of them.

I discovered Star Trek in 2000. I worked the 6 am – 3 pm shift back then and would rush home to watch the sci-fi channel because Star Trek would be on by the time I got to my TV. Mr. Spock was quite the looker; I will not lie. He evoked creativity and jump started my imagination (as cliche as the notion is). I wrote silly adventure stories on the Enterprise involving him and Kirk, which were stored on floppy discs long forgotten and long lost to many moves and deployments.

A friend and I would go to the local Italian fast food place because they had crayons and paper–the staff was all about not adulting when you didn’t have to adult. We drew the craziest things, but they always involved Kirk and Spock. The restaurant staff knew us by name, and we convinced them to post one of our silly pictures on the wall next to the children’s drawings they let parents pin on the wall. 

Mr. Nimoy, 
Your brought joy to millions in just as many ways. May you rest in peace.

~M.L. Crabb

Weekly Roundup: I Haz Contest and Catch-up Bowl MMXV

After working 10 days in a row and fighting off a nasty cold, I am finally back to the random whims of what we call free time!
The painting used in this graphic is Daydreaming by Edward Harrison May.

Catch-up Bowl MMXV
I enjoy my job, but running a work marathon without a day off gets to you. The nasty cold didn’t help matters either! By the end of it, I was neckbearding my evenings away by binge watching trashy shows on Netflix.

Oh how I missed revising my “Omg, orcs!” book! I was too drained to even look at the thing
.

Now that everything seems normal with my schedule, *knock on wood* I’m hoping to jump back into my routine. I’ll tell you what though, today I’ve been that daydreaming woman in that painting! I slept in late and haven’t accomplished a thing except for this post.

I don’t have a catchy transition sentence to jump to the fact that I liked my OMG orcs! drawing so much that I did a Delenn (from Babylon 5) version and a special V-Day contest Star Trek red shirt edition.

[ Insert flashy transition sentence here ]
V-Day contest and giveaway!
I am giving away a signed copy of The Year is Now OR a free digital drawing* (winner’s choice) to the person who has the best caption for Red Shirt Girl!
How to Enter:
1. Message me on Facebook, through the contact form on the right, or email me (thecommanddeck [at] outlook [dot] com) with our dear Red Shirt’s caption.
2. Use V Day Contest as the subject
3. If you want to edit the image and insert your caption in the speech bubble, you are more than free to do so! Send the image as an attachment.
All entries must be received by 15 February, 2015!
Rules
1. Multiple entries by one person are okay.
2. International entries are okay.
3. The winner must choose between the signed copy or the drawing (see information).
4. No hate regards to race, religion, or orientation.
Information:
Drawing – The drawing will be of one person, character, or animal against a simple background. It may take me 3 weeks to complete the drawing depending on if I get scheduled a crazy 10 days in a row again or not.
Signed Book – Will be mailed off on my next day off after 15 Feb.

Weekly Roundup: Klingon Squirrels and Forgotten Treasures

~ Your number one source of Empire News!

This Week in Awesome

It doesn’t get more awesome than winning a Warrior Woman CD! I entered the G & T Show’s Martok Squirrel contest.

This just in: a police sketch of the elusive Martok Squirrel. Authorities report that he was last seen on Fallen Acorn 9 and is headed for HiddenNutia Prime.

It is reported that he is hoarding several crates of acorns. If you happen to see or have any information on General Martok Squirrel, please contact your nearest Federation security outpost!

The cover of the CD itself is badass. There is no other way to put it.

About the G & T Show:
“The G & T Show is an irreverent podcast dedicated to quality storytelling, interesting characters, and the latest news emerging in and around the Star Trek Universe. However, we are so much more than just another Star Trek podcast. We discuss films, television shows, books, comics, games, fan productions, conventions, cosplay, and so much more. The G & T Show is the premiere podcast for the modern Geek “


Forgotten Treasures

You’d be amazed at the things you forgot you saved to a flash drive, the one that’s been shoved into the darkest corner of that drawer you never open….

I found a 32 page novella I wrote during my last year of college. I remembered it as soon as I saw the file name. I also remembered how much I slaved over that thing with revisions…so I read it. It is a polished story that is almost ready to go! I couldn’t believe my luck at finding this forgotten gem.

A preview of the cover (it may or may not change)
The Outlanders
I think I may have to change my game plan because I want to make sure that I complete the comic. The amount of time I spend per page on the thing is astronomical–no joke! You would not believe the hours creating a single scene takes. I just can’t keep up, and I feel bad!
I am much faster at drawing things by hand. As much as I adore digital art, it takes me a looooooooong time to finish a single picture. Comics have a variety of things going on in a single page. Spending five hours on one page is finishing it in record time for me (just to give you an idea). Why am I rambling on and on about this? I decided that I’m going to do a test run with black & white pencil/ink pages. 

DIY – Your own Star Trek Redshirt

A quick costume for the Trekkie at heart. Wear it at parties, incognito, and at conventions!

It’s not an authentic Star Trek uniform, but it will do the job if you just want something simple. What you will need:

1 Redshirt – You can either recycle an old T-shirt or pick one up at the store. They run relatively cheap. I got mine for less than $10. Pick a shirt that fits the way you want to fit it (I am not a fan of the droopy, over-sized awkward angle 80s flair that’s coming back in style. A regular V-neck T-shirt worked just fine!). 

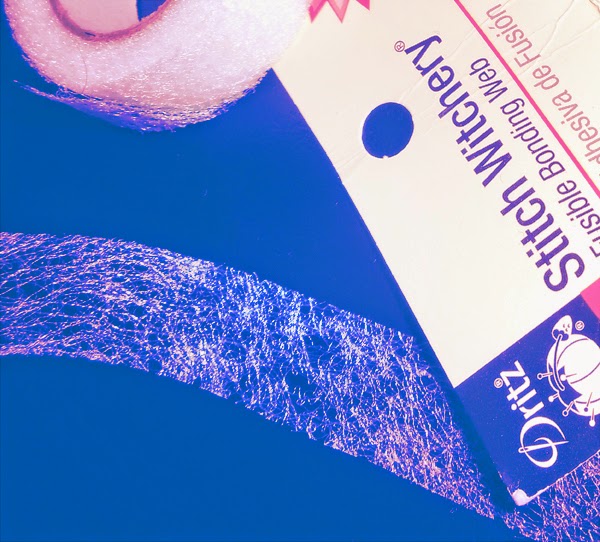
1 Stitch Witchery Roll – These run under $5, and you will have a lot leftover to use for other projects. Stitch Witchery beats hours and hours of hand sewing any day!

2 Black Strips – Considering that 80% of my wardrobe is black, I had no trouble finding an old slip to butcher for this project (I never wore it anyway). You can use anything so long as it’s black.

Minor Sewing Supplies – Pins and a needle & black thread.

Step 1
Lay out your shirt and measure the length of the front neckline. For brevity’s sake, I’ll pretend that everyone has a V-neck–You will have a happier time with a V-neck…Trying to worm a black strip around an oblong collar is not my idea of a good time.

You will also want to measure the width of the neckline as well. Multiple it by two to leave room for the underside.You want some of your black cloth to be on the underside so that you can fold it over onto the front.

Tip: Measure the length from the point of the V to the tip on each side.

Step 2
Cut out two strips of black cloth using the measurements from step 1. I wanted mine to have a little pizazz, so I used the bottom section of my slip (the part with the lace on it).


Step 3
Cut four identical strips of Stitch Witchery. These will be used to attach the collar.

Step 4
Place one strip of Stitch Witchery on the half of your black cloth that is going to be on the underside of your collar. Flatten and pin it to the underside of your collar.

Step 5
Follow the instructions on the Stitch Witchery package to iron it together.

Step 6
Repeat steps 4 and 5 three times (once more for the underside of the second strip, and twice for the front sides). When you are ready for the front, take extra care when you are folding it over and pinning it. Make it as flat as possible.

When you are about to iron the final front strip, you may have to cut a few tiny pieces of Stitch Witchery to get the fold at the tip of the V right. 

Step 7
Once it cools down, make any necessary adjustments with your needle and thread. If you did a perfect job of ironing, you won’t need to venture into tedious waters like I did! I had to mend the point at the V shape.

Optional
 Step 8
If you want to go the extra mile and do the back part of the neckline, repeat the above steps. The back neckline is always slightly rounded, so tread those waters at your sanity’s risk!

 Add a badge, and you are done! 

DIY – Star Trek Peg Dolls

Star Trek: The Original Series Peg Dolls

Wooden peg dolls are fun, they make great gifts, and they make wonderful additions to your collectables shelf. For those who have been following this blog for a long time, you have seen my intricate Babylon 5 peg dolls. I decided it’s time to take a minimalist approach and post a DIY for you all!

I chose Star Trek: The Original Series because their uniforms are basic, and skimping on the details won’t matter. Why? They still look great, and you can identify them as Star Trek from a mile away.

What you will need:
1 (or more) blank wooden peg
1 Pencil
2 Paint brushes – 1 tiny brush, and 1 small/medium brush
Acrylic paints – you can get a basic set fairly cheap
1 Cup of water and paper towel (to wash/dry the brushes)
1 flat surface to hold the paint – a paper plate will do just fine

The first thing you want to do is to sketch your design onto the peg(s). The trick is to emphasize characteristics unique to that character so that the minimalist approach won’t matter. For this exercise, I am doing a peg doll of Ensign Chekov and myself (hey, who hasn’t wanted to be a part of their favorite TV show?).

Chekov is known for his yellow/gold shirt and the way his brown hair is parted. Those will be the two aspects I will emphasize. I have curly brown hair…and etc!

Dot the eyes and mouth with the tiny brush and let it dry (it only takes a few minutes!). You want to do the face first because you will need to hold onto the head when you start painting the body.

Once the face dries, hold the peg between your thumb and index finger. I like to hold the base of the peg on my thumb while my forefinger presses down on the top of its head. It makes it easy for me to turn it as I paint the body because it helps keep both of my hands steady.

With that being said, be careful; you may get paint on your thumb! Keep a watchful eye and immediately wipe it off in order to prevent it from smudging a spot you’ve already painted.

Paint the large, basic areas first (ex: Chekov’s yellow shirt and black pants).

Next, paint the black collar with the tiny brush. It should look like a simple, triangular stripe as shown. Let the body dry before you start the hair (you will need to hold onto the body in order to finish the head). In this case, I grabbed the “me” doll and started painting her red dress and black shoes while I waited for Chekov to dry. By the time I finished her outfit, he was dry.

…And here we have them! Two Star Trek: The Original Series peg dolls.

Guess how long they took?
Thirty minutes!

That’s it–thirty minutes for two dolls! You can apply the minimalist technique to any show and end up painting some awesome pegs.