Tag: doll

Rainbows and Yarn

Day 20 of my post-a-day challenge! Well, it looks like I missed yesterday, but 18 out of 20 is still a good track record. Yesterday was spent playing video games, knitting, and cleaning (yuck to the cleaning). The year is 2014, where are these cleaning robots that sci-fi has promised us?

Rainbow Dash Doll

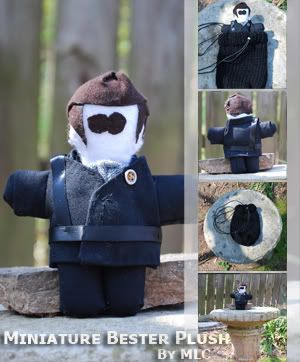
Here is what I finished yesterday. I may use buttons for the eyes because the eyes are the only part I’m not 100% satisfied with. It’s a Christmas present for my neice–yes, I realize Christmas is several months away, but I work in the services/retail industry, and it doesn’t matter if I work in a repair shop; the masses come. They come in droves. It’s an all hands on deck sort of deal.

In other words, come November, I won’t have time to make anything complicated….Time to ponder what I’m going to make/do for the rest of my family…*puts on thinking cap* Ouch!

Here’s to having a good weekend: c[_]

~ Cheers! 

Month in Review: January

I’ve added another link to my News section on the right side of the blog, 21! It explains the countdown at the bottom of my blog. I am very excited about the mysterious project. 😉

I updated the graphic for my medical bills. Only $400 to go, and I’m done with that fiasco. It just goes to show, that even if you have insurance, you still come out at the bottom of the barrel. Now…if I happened to win the lottery….One can dream, can’t she?

Here is what I’ve accomplished for the month of January:

Vorta Lovin’ – I participated in an art trade with another artist, and this is what she wanted. Don’t you just love it when you like the subject matter just as much as the other person? I had a blast with this piece.

I do not own, and nor did I create Star Trek


I, Me – This was featured in my last post

….and 1 super secret illustration

Books read
The Bell Jar by Sylvia Plath – an enjoyable read
The Iron Heel by Jack London – I give it a “meh;” however, given that it was written in 1908, it is worth a read if you can get through the first 100 pages.

Return to Tomorrow: March

This month flew by. It went so fast, that I almost missed it!

I’m happy to report that I’ve been able to keep up with my New Years Resolutions so far. This month sported 2 projects, both of which were posted:

Is Winter Over Yet?
A Very Bester Surprise

I’ve been doing overtime for the past week, and I am wiped out! I will be doing it next week, and here’s to crossing my fingers that they don’t extend it after that! I don’t know what I will do about art projects if they do–Art projects…sanity…relaxation…

I spent the bulk of this Saturday (oh, my precious, darling Saturday!) at the hospital getting stitches. This weekend sure slipped through my fingers! I’m fine though, so that’s what matters I suppose.

Books read:
1/3 — I’m still working on The Watchers Out of Time. Books of short stories take me a while to read. I’m going to pick a novel for my third book; I hate that this one is taking me this long.

A Very Bester Surprise

Here is that promised lengthy post about the miniature Bester plush I finished last weekend!


“A Very Bester Surprise”
13.5 cm tall || 12 hours || sewing project

Yes, he really took 12 hours to create! This was my first attempt at creating a plush, and it was all hand sewn. I even created the pattern from scratch (this is included in that 12 hours).

I started out three weeks ago, spending about 2 hours each night after work on him that first week. The following week was freezing (in my opinion), and I didn’t spend as much time on him. I’m not one for cold temperatures. Even if I’m in layers with heat, I tend to not move, want to move, or do anything! It’s just how I roll.

Where was I? Ah, yes; that second week wasn’t very productive, but the following weekend was a warm one, and in that 2 day span, I finished him in record time! I had to make a stop at the local craft store for some fabric glue because I had to get the hair just right. What I had initially sewn on ended up warping and shrinking after I stuffed his head. Bester’s sideburns are classic, and I wasn’t about to skimp out on those!

I’ve uploaded a tutorial on my blog; feel free to check it out and test the waters (it’s my first tutorial for something like this, so I hope I made it easy enough to follow). I hope you enjoy the chicken scratch and formulas I left on the patterns! Who says Math has no use in the real world? 😉

Check out the tutorial
I added Mini Bester to Needles and Pins

Alfred Bester is part of Babylon 5, written by JMS — I do not own/create Babylon 5

Plush Doll Tutorial

How to Make a Miniature Plush Doll

By MLC 2011

| Doll Pattern | Optional Coat Pattern |

If you decide to use and post the pattern, please credit me, thank you!

Using the Pattern

***The pattern is marked with measurements to make it scalable***

  1. Print the pattern
    1. Click the link, “Doll Pattern”
    2. Right click, “save as” and follow the prompts
    3. Print from a photograph/picture program
  2. Cut the pieces out
  3. Pin them to fabric (for the ones that need 2 pieces, fold the fabric over before pinning it in place)
  4. Leave ½ cm of fabric around the pattern edges (or more depending on how thick you want the limbs and torso)

Limbs

  1. Leave a lot of space at the top of the pattern (as shown) when you make the initial cuts
  2. Fold in half (over the dotted lines in the patterns)
  3. Sew along the bottom and edge, leaving the top open
    1. *optional* you may cut it so that the bottoms are rounded
  4. The limbs should look like small tubes: stuff them with stuffing of your choice
  5. Leave some of the space at the top free because you will be inserting that part into the torso (so that the limbs can be sewn into it)
  6. Sew a straight line to close the stuffing off (make sure the seem is closer to the stuffing than it is to the end of the limb)

Optional (feet)

  1. Use the circular patterns and follow the steps for “Using the Pattern”
  2. Sew into the soles of the feet instead of sewing the bottom of the legs shut

Head

*** You may have to cut the head a bit larger than shown in the pattern (depending on personal preference and hair style) ***

  1. Follow the instructions for “Using the Pattern”
  2. Make sure you make the neck extra long, as this will be used to connect it to the body
  3. Hair and eyes can be pinned to the outer sides at this stage
  4. Sew the seams shut, but make sure you leave the neck open enough so that you can stuff it
  5. Stuff it, leaving enough loose space in the neck to allow you to insert it into the body
  6. Insert it into the completed Torso and follow the steps for “Finish the Doll”

Torso

Arms/sides

  1. Start with one side
  2. Pin the two pieces together. As you do this, pin one of the arms between them in its respective slot
  3. Make sure the stuffed arm is inside the torso and not hanging out of the future seam (only the long/loose end should be hanging out)
  4. Sew the pieces together
  5. Using the other side of the torso, open it to make sure the arm is attached to the seam you just finished
  6. Fold the side back so that it’s “inside out” (the stuffed arm should be inside the torso)
  7. If the other arm fits inside of the torso, allowing you to pin everything in place, repeat steps 1 – 6 and skip to step 15. If not, go to step 8.
  8. Fold one of the ends to the other side over as though you are hemming a garment
  9. Pin the other arm to that end only (stuffed end should be pointing away from the hemmed side)
  10. Make sure the torso is “inside out”
  11. Start from the bottom of the other side and sew the seam shut until you reach the arm
  12. Flip the torso so that its not “inside out” anymore
  13. The second side (the open arm slot) should naturally fold over now that you’ve started sewing the seam (if not, make sure it is folded like a hem)
  14. Sew along the nice, folded edges you made to secure the arm in place

Legs/bottom

  1. Fold one of the bottom sides up (make sure the torso not inside out), into the body as though you are about to hem a garment
  2. Pin both legs along that side with the loose ends up, inside of the torso (stuffed ends should be hanging free)
  3. Fold the other bottom edge of the torso up as you did in step 15
  4. Sew along that outer edge, securing the legs in place

Finish the Doll

  1. Fold the top ends over as though you are about to hem a garment
  2. Insert the completed head and hold it against the back end (you can pin it in place if you want)
  3. Stuff the torso
  4. Sew the folded ends shut, securing the stuffing and head in place